
Adding a product
Record the goods you sell and your raw materials once, with code, unit, cost price, selling price and pictures.
On this page
- Adding one product
- Factory barcode and shop code
- Other fields in Product Identity
- Printed name
- Registration numbers and halal certificates
- The Tracking section
- Fields in Price & Stock
- Units, racks and pictures
- Size and colour variants
- Adding a product from another screen
- Changing and deleting a product
Everything you sell and every raw material is recorded under Master Data → Products. You record a product once, then use it at the till, in purchases and in stock.
Adding one product
-
Open Master Data → Products.
-
Press New Product.
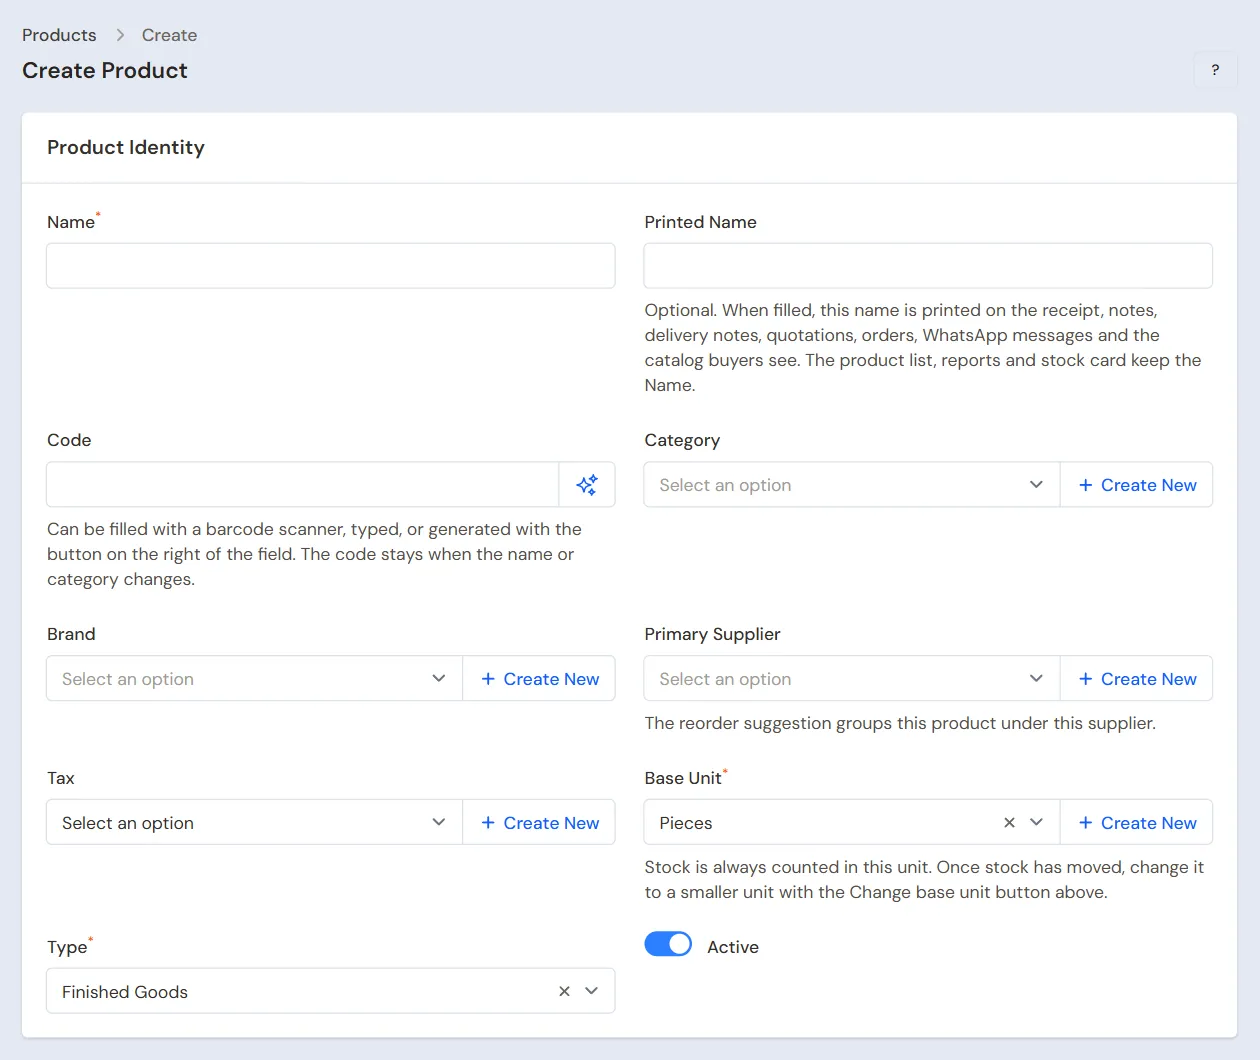
The Product Identity part. The button on the right of the Code field makes a code automatically. -
Fill in Name the way the cashier usually searches for it, for example Gula Pasir 1 kg.
-
Fill in Code. Scan the barcode on the pack, type a code yourself, or press the Generate code button on the right of the field. A new product with the code left empty or typed as AUTO gets an automatic code when it is saved (the word AUTO is never stored as a code). When the code is the barcode the maker printed on the pack, tick Factory barcode beside it; see Factory barcode and shop code.
-
Choose Category and Brand if there are any.
-
Choose Base Unit, for example Pieces. Stock is always counted in this unit.
-
Fill in Cost Price and Selling Price, both per base unit.
-
Press Create. To fill in the next product straight away, press Create & create another.
Tip: Category, brand or unit not in the list yet? Press + Create New next to the field to create it right here. It only shows when you may add that data.
Factory barcode and shop code
A code is either the maker's (an EAN or UPC barcode already printed on the pack) or one the shop made itself (for example 000123). Tell them apart with the Factory barcode box right beside the Code field. On a phone the box sits right under the Code field.
- Only a code made of digits can be ticked. A code with letters or other marks is refused with the reason: untick it when the code is one the shop made.
- When the code has 8, 12 or 13 digits, Vende checks its last digit (the EAN/UPC check digit). When it does not fit, a typing-slip warning shows under the field, but the product can still be saved.
- A code the shop generated is never a factory barcode, and a tick without a code is not kept.
- In the Other Units table, the Factory column beside Barcode works the same for each unit's barcode (see Base unit, other units and main unit).
- In the Product List, the Factory barcode column (hidden at first, turn it on in the column picker) and the Factory barcode / shop code filter help find goods by the kind of their code. The same filter picks what Export to Excel contains.
- Print Labels marks goods with a factory barcode and starts them at 0 labels, because the pack already has a barcode.
Other fields in Product Identity
- Primary Supplier: the supplier you usually buy this product from. The Reorder Suggestion report groups goods by this supplier.
- Tax: the tax of this product. The tax is only charged on notes when Collect tax on notes is on in Settings → Sales.
- Type: choose Finished Goods for goods you sell. Choose Raw Material for materials you do not sell directly, for example materials used up when a service is sold. Raw materials do not show on the sales screens, unless Show raw materials is ticked there. See Selling raw materials.
- Active: turn it off when you no longer sell the product, without deleting it.
Printed name
Printed Name may stay empty. When it is filled, this is the name the buyer reads: on the till receipt and its WhatsApp message, the A4, A5 and dot matrix notes, the invoice, the delivery note of a sale or order, the quotation, the sales order, the service note, the customer price list, price labels, the catalog, the online store, table ordering and the buyer portal (also goods another shop orders through shop-to-shop ordering).
The product list, reports, the stock card, purchase notes and stock documents keep the Name. At the till, in the product picker while you fill in a note or a form, and in the search of the Products list, you can type either name. Searches in reports and note details look for the Name only.
For example, mineral water bought from a supplier with a tax invoice and without one can be recorded as two products so their stock stays apart:
| Name | Printed Name |
|---|---|
| AQUA 600ML (PPN) | AQUA 600ML |
| AQUA 600ML (NON PPN) | AQUA 600ML |
Both print AQUA 600ML on the buyer's note. Sales tax still follows the shop's PKP status: when the shop collects tax on notes, both products are charged the same sales tax.
- An old note also prints with the Printed Name in force when it is printed again, because a note keeps the product, not the written name.
- When Write names in CAPITALS is on, the Printed Name is saved in capitals too.
- On a variant, the Printed Name follows its parent's with the variant's values, for example AQUA - 1500ML. Fill in the Printed Name on the parent product.
Registration numbers and halal certificates
When the Registration & certificates feature is on, the product form has a Registration & Certificates section for the BPOM registration number and the halal certificate. See Registration numbers, halal certificates and customer licences.
The Tracking section
The Tracking section shows when the extra Batches & expiry or Serial numbers feature, or the Production feature, is on for your shop. Here you turn on Track batches & expiry or Track serial numbers for that product. When batches and the Production feature are on, a Shelf life field (a number and days, months or years) appears; it fills in the expiry date when production output is received. The exact expiry date is entered per batch when goods come in, not here. See Batches and expiry dates and Serial numbers and IMEI.
A shop with the Production feature also sees Made when ordered here. Switch it on for menu items made when they are ordered, such as coffee or café food: when the note is saved, the materials of its production recipe for the quantity sold leave the note's warehouse at once and become the line's cost, while the menu item itself has no stock. The mark can only be switched on once the product has an active production recipe. In a café or a street stall it switches on by itself when the first recipe of a new menu item is saved. When the product has several active recipes, the first by name is used. Goods made ahead, such as chips at a factory, are still recorded with a production. See Café guide.
Fields in Price & Stock
- Cost Price is updated by itself from purchases and opening stock. Vende uses the average cost price. This field, the Cost Price column of the product list and Automatic price only show to holders of Sensitive Reports; anyone else saves the product without changing its cost price, and a new product starts at 0 until a purchase or opening stock sets it. See Cost price of goods.
- Selling Price applies in every branch. When it is lower than the cost price, holders of Sensitive Reports get a warning.
- Quantity prices: cheaper prices for buying in larger quantities. See Quantity prices. The Bulk Price Group field at the top of the form, when the Bulk price groups feature is on, adds several products together for this price, for example Spandek 3M and 4M.
- Discount Limit: the largest discount on this product. Leave it empty to follow the category.
- Cashier Loss Limit: how many percent under cost a cashier without the Sell Below Cost permission may still sell this product. Leave it empty to follow the category. A lower price goes to Ask a manager.
- Minimum Stock: the low-stock limit. See Minimum stock and stock alerts.
- Leave out of alerts: turn it on for display goods.
Units, racks and pictures
- Other Units: other units to buy and sell in, for example a Box of 24. Once there is another unit, Selling Unit (optional) sets the unit a sales line starts in. See Base unit, other units and main unit.
- Rack Location: where the product is kept in each warehouse, for example Rack A-3. The purchase screen and the stock document screens can find goods by their rack.
- Product Images: upload up to five pictures. The first picture is the main one. Drag to change the order. On a phone, press Camera to photograph the product right away, or choose a picture from the gallery. The Camera button is on every image upload box.
Size and colour variants
Goods that come in sizes, colours or other options are recorded as one parent product with its variants. The Variants section shows while the Product variants feature is on. See Product variants: sizes, colours and more.
Adding a product from another screen
On the purchase, purchase order, stock adjustment and stock transfer screens you do not have to go to Master Data.
- Tap the search box, or type the product name.
- Choose Add a new product under that box. It is always under the search results, also when similar products are found. When nothing is found, press ↓ then Enter.
- In the New product window, fill in Name, choose Unit, then fill in Selling Price. Cost Price may stay empty if you do not know it yet. The next purchase fills it in. A Photo may be added. On a phone, press Take photo to photograph the product or Choose from gallery for a photo already there. On a computer, press Choose photo or Webcam.
- Press Save and add. The product is saved and added as a line at once.
This choice only shows when you may add products.
Changing and deleting a product
- Press a row in the product list to see it: identity, prices, units and stock per warehouse. Press Edit on that page (or the pencil icon on the row), change the fields, then press Save changes. The Edit button is there only for those who may change products; other users can still see the details.
- A category, brand, supplier, tax or unit that was deleted or switched off stays on the products that use it. It shows marked (inactive), and the product can still be saved. A new product is offered only the active ones.
- The product page has a Stock per Warehouse section. Stock changes through purchases, sales and stock documents, not here.
- The Delete button is at the top of the product page. A deleted product can still be restored through the Deleted records filter in the list.