
Recording a sale on the till
Search or scan the goods, check the note, then press Pay to save the sale on the till screen.
On this page
On a wide screen, the till shows the product catalogue on the left and the note on the right. The order is always the same: find the goods, check the note, then pay.
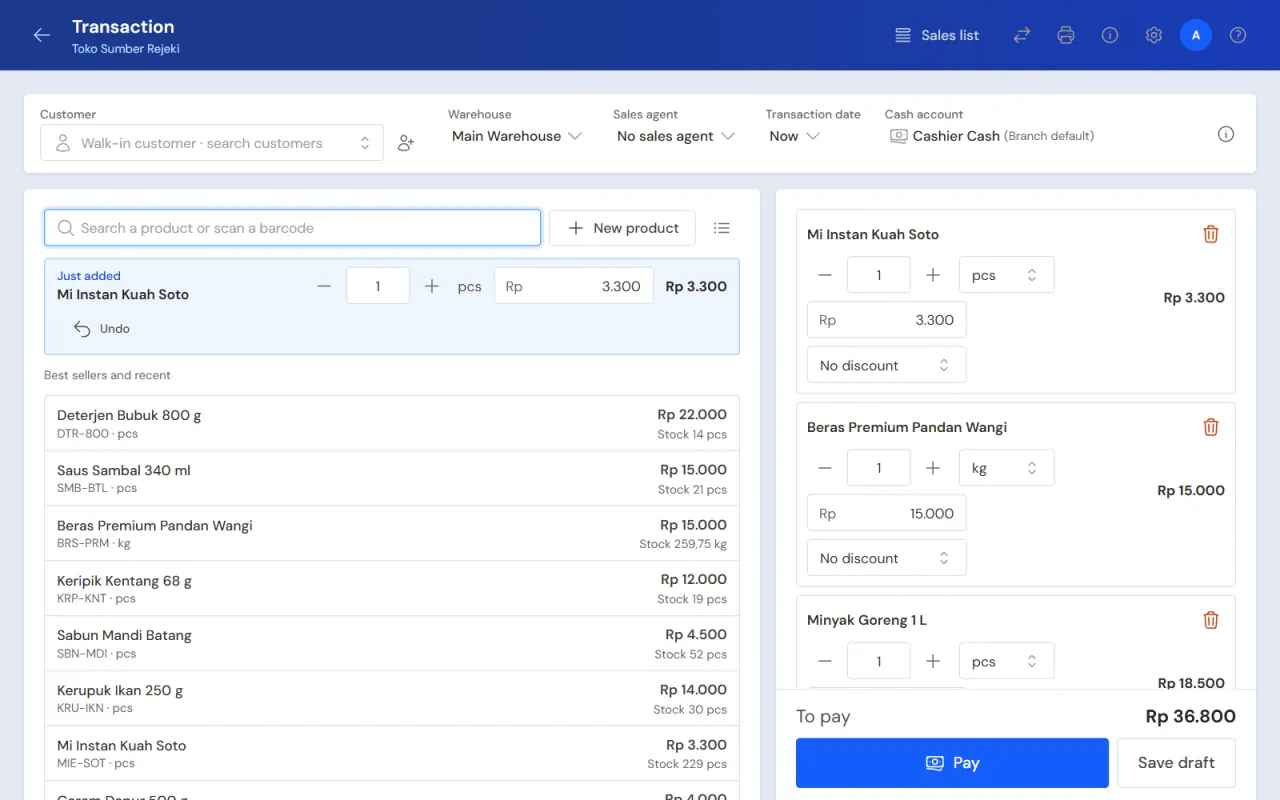
Open the till with New sale on the Dashboard or in Transactions → Sales. See Choosing a sales screen if another screen opens. While you finish a draft or change a note, the How sales are entered button stays: choose Invoice mode and the same note opens there.
Note details
At the top of the screen there is one row holding the note details. Values you rarely change only need a press to edit.
- Customer: leave empty for a walk-in customer. Choose a customer to record a receivable, use the customer's prices, or collect points.
- Warehouse: the goods' stock is taken from this warehouse (when the shop has more than one warehouse).
- Warehouse for this line: under each line, when the shop uses Several warehouses. Left on Note warehouse, the goods leave from the warehouse above; picked, that line takes its stock, batch and serial numbers from that warehouse, so one note can take goods from several warehouses.
- Return warehouse: appears when a line is a return and the shop has more than one warehouse; the goods brought back go in here. By default the branch's return warehouse.
- Sales agent: the sales agent who handled this sale (when the extra Sales agents feature is on and the shop has sales agents). Filled in automatically with the sales agent linked to your login (Linked User on the sales agent) at the start of every new sale; you can still change or empty it.
- Transaction date: Now means the moment the note is saved. You can only choose another date when you are allowed to.
- Cash account: the cash account where cash taken on this device goes.
On a phone, these details are summed up in one row. Tap that row to change them.
Choosing the customer
- Press the Customer field, or press F4.
- Type the customer's name or phone number, then choose from the list.
- Not registered yet? Choose + Create new under its list (a typed name is filled in), or press New customer (the plus icon) beside the field. Fill in Name, WhatsApp number, Address (optional) and Customer group if needed, then press Save and choose. Both are there only when you may add customers.
A scanned member card also chooses its customer at once. Their points balance and receivable are shown too.
Adding goods to the note
- Type the product's name or code in the search box, or scan the barcode and press Enter. The F2 or / key goes straight to the search box.
- A product whose code matches goes onto the note at once. For other products, tap the product in the list.
- To add several at once, type the quantity, an asterisk, then the code. Example: 5*8991234567890 adds 5 of that product.
Before you type, the list shows the best sellers and the most recent products. A product with a Selling Unit shows its price and stock in that unit (for example Rp 72.000 / Box, stock 12 Box), matching the line a tap adds. Stock that has run out is marked red.
A new line starts in the product's Selling Unit when it is set, else the base unit. A scanned unit barcode or product code still wins. Change the unit on the line if needed. See Base unit, other units and main unit.
While the Product variants feature is on, a product with variants shows once with how many it has, for example Kaos Polos, 8 variants. Tap the product, then tap the variant in the Choose a variant window. Scanning a variant's barcode puts that variant on the note at once. See Product variants.
The product is not in Vende yet? Press + New product beside the search box (+ New on a phone), or press Add a new product when the search does not find it. Fill in Name, Unit and Selling Price, then press Save and add. The product is saved and goes onto the note at once. This choice is there when you may add products. The full details are entered as in Adding a product.
Selling raw materials
A factory sometimes sells its raw materials, for example Plastic Pellets to another factory. There is no need to change their type to Finished Goods. Tick Show raw materials above the product list, and raw materials then show in the list, in the search and when their barcode is scanned. They are marked Raw material. Untick it to hide them again.
- The choice is only there when the shop has an active raw material, and it is remembered for you on this device.
- A raw material is sold like any other product: its stock goes out at the average cost price, its cost of goods sold is recorded, it can be returned, and it counts in the sales reports.
- The same choice is on Invoice mode, Quick sale, sales orders and price quotations. The online catalogue and the online store still show Finished Goods only.
- The till's product windows for free goods, returns without a note and compound ingredients follow the same choice. For example, Empty Capsules of the Raw Material type can be picked as a compound ingredient while the box is ticked.
Checking the note
The product added last is always shown at the top. On each line you can:
- change the quantity and unit, for example from pcs to box;
- give a line discount (see Giving discounts and free goods);
- remove the line with the bin.
Only the shop owner and holders of the Cashier Manager role can change the price on a line. Tap the price: the old number is selected at once, so the price you type replaces it. The price can also be typed in the Just added part right after the product goes in, so on a phone there is no need to open the note first. This also works for a service still listed at Rp 0, for example one whose price differs for every order. Other users sell at the list price.
When the customer has a special price, that price is used at once and its source is written below the line.
When a product is sold in a unit other than its base unit, for example sheets of roofing whose base unit is the metre, the line shows the price of one base unit after the line discount and the customer group discount, such as = Rp 40.000/m for Rp 120.000 per sheet of 3 m. The figure is only there to look at and follows any change to the line's price or discount; the line is still sold in the unit chosen, and the figure is not printed on the receipt or the note. A line in the base unit does not show it.
Scanned the wrong thing? Press Undo in the Just added part.
When the recorded stock is short, the line gets a warning. The note can still be saved, but check the stock records again. For a menu item that is Made when ordered, its recipe's materials are checked instead, for example Short on materials: Susu Cair (0 l left, 0,2 l needed); the materials of all menu lines on the note are added together. In Invoice Mode and Quick Sale the warning shows after the note is saved.
Delivery address and shipping
Shipping and couriers at the till are an extra feature. If the delivery address and shipping button is missing, contact the Vende team to switch it on.
When the goods are delivered:
- Press Delivery address / shipping.
- Once this part is open, the delivery address is already filled in from the chosen customer: their main delivery address, or the customer's Address when they have no delivery address. Change it by choosing another of the customer's addresses, or choose Type another address and type it. An address you typed is not overwritten when the customer changes.
- Press Add shipping when there is a shipping cost. Fill in Shipping amount, then choose Charged to the buyer or Borne by the shop.
- In Paid to the courier from, choose the cash account that pays the courier, or Not paid yet (owed to the courier) and then choose the courier.
Shipping charged to the buyer goes into the bill total. Shipping borne by the shop is recorded as an expense and lowers the profit of the note.
Saving the sale
- Check To pay below the note. This figure is always visible, however long the note.
- Press Pay, or press F8.
- Fill in the payment, then press Save transaction. The steps are in Taking payment at the till.
Once saved, the receipt appears on the screen to be printed or sent by WhatsApp. A note not fully paid can only be sent by WhatsApp by a Cashier Manager, see Notes not fully paid. Press New transaction for the next buyer.
On a phone, the number of lines and the total are at the bottom of the screen. Press View note to check its content, or Pay to pay straight away.
Saving a draft
The customer is not ready to pay yet? Press Save draft. A draft does not change the stock or the cash yet. The serial numbers already chosen are kept and only checked when the draft is paid. See Serial numbers and IMEI.
To finish it, open Transactions → Sales, choose the Draft tab, open the note, then press Edit this note. The till opens with the content of that draft, ready to be paid.
Tip: A note that is not saved yet is remembered on this device. A page reloaded by accident does not lose the goods you already scanned.
Customer display
For minimarkets and shops where the cashier faces the buyer: press Customer display at the top to show the goods, total and change on a second monitor or a tablet. See Customer display at the till.
Keyboard shortcuts
| Key | What it does |
|---|---|
| F2 or / | Search products |
| F4 | Choose the customer |
| F8 or Ctrl+Enter | Pay |
| F12 | Save and print |
| Esc | Cancel or close the window |
| ? | Show the list of keyboard shortcuts |