
Setting the print layout
Set the letterhead, item columns, terms, signatures, bank accounts, and the COPY mark of each kind of printed document.
On this page
Invoices, delivery notes, payment receipts, and other documents can each have their own layout per kind of document. Set it in Settings → Print, in the Documents section.
This layout applies to A4 and A5 documents and to PDF reports. Dot matrix prints and receipts stay plain. Only the marks on the print and the terms and conditions also go onto dot matrix prints.
The general steps
-
Open Settings → Print.
-
In the Documents section, choose the Document you want to set, for example Sales note. For a note not yet paid, choose When not yet paid (Invoice) below it. Only the choices that suit that document are shown.
-
Set the document top, the item columns, the bottom part, and the marks on the print. How is explained below.
-
Look at the Preview. The preview uses the shop's latest document of that kind, or a sample when there is none yet. Press Download a sample PDF to see the printed result.
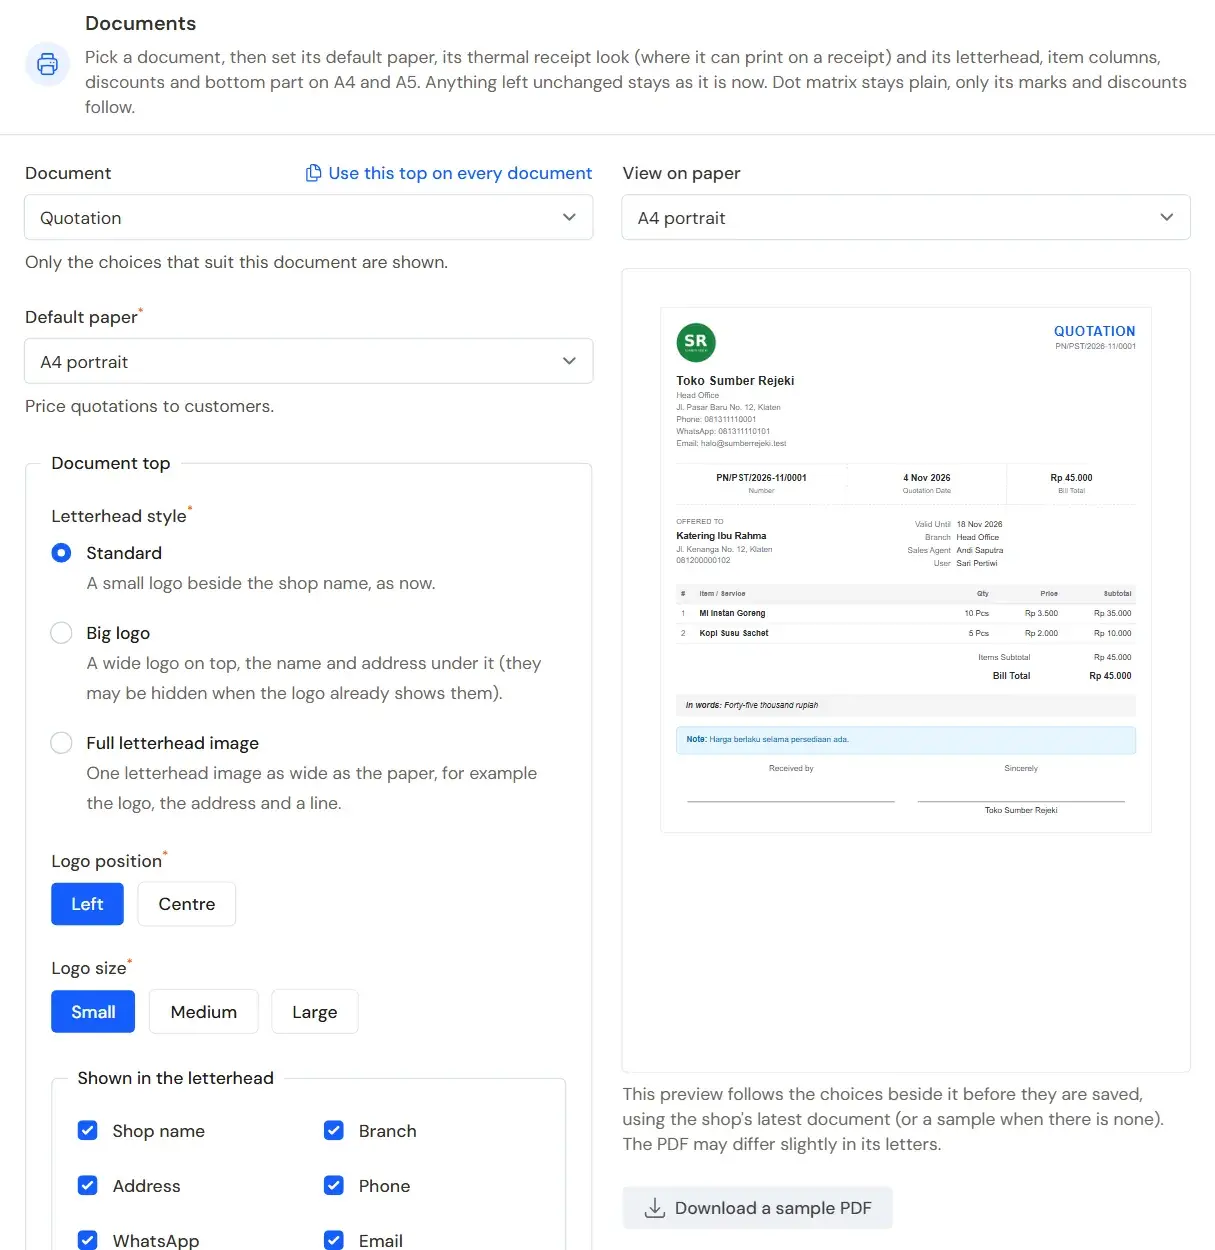
Document settings with their preview beside them -
Press Save changes. The choices of every document are saved at once.
Choose Reports and other sheets to set the top and the foot line of PDF reports.
Document top
Choose the Letterhead style:
- Standard: a small logo beside the shop name.
- Big logo: a wide logo on top, with the name and the address under it.
- Full letterhead image: one letterhead image as wide as the paper, for example with the logo, the address, and a line. Upload the image in Letterhead image.
Also set the Logo position, the Logo size, and the Title colour. Under Shown in the letterhead, turn off what the logo already shows, for example the shop name.
Want every document to use the same top? Press Use this top on every document, then Copy the top, then Save changes.
Item columns
Tick the columns that should be printed:
- Brand (under the item name)
- Product code
- Small product photo
- Unit after the quantity
How discounts are shown
Under Discounts pick one way for this kind of document (sales note, invoice, quotation, sales order, service note, purchase note, PO). Each way applies to A4 and A5 PDFs and dot matrix. The till receipt follows the Sales Note choice when the note is paid, and the When not yet paid (Invoice) choice when it is not. A struck-through price cannot be drawn on dot matrix or the till receipt: dot matrix prints the net price and the receipt adds a "normal price" line. On A5 upright the discount columns move under the price.
- Discount total per line: as before, the Discount column holds the line's whole discount.
- Discount per unit: the line's discount divided by its quantity, for example Rp 124.000 per pcs.
- Discount per unit and total: both columns at once.
- Discount in percent: the discount as a percent of the price.
- Discount as typed: for example 10%+5% or Rp 124.000/pcs.
- Price after discount: no discount column, the printed price is already the net price per unit.
- Struck-through price + net price: the normal price struck through, the net price under it.
- Struck-through price + discount per unit: the struck-through and net price, plus a discount per unit column.
Three extra choices:
- Spread the note discount over the line prices: the Note Discount row leaves the summary, each line's net price already holds it. The rounding left over goes to the last line, so the total stays the same.
- Show a "You save" row: all line and note discounts together. A purchase note says "Total supplier discount".
- Also show the quantity in the base unit: a line in boxes also says, for example, "= 240 pcs".
A line's subtotal is always the stored figure. When a per unit discount does not divide evenly (Rp 1.000 on 3 pcs), the figure is marked with ~ and the total stays right. Free goods and promo goods print with Free or the promo's name.
For one print only, for example a quotation for one customer, pick How discounts are shown in the Print PDF window. The shop settings do not change. On the Item Details screen the discount shows as a total and per unit together.
An old Discount per line setting that was off is read as Price after discount.
Bottom part
- Terms and conditions: printed on every document of this kind, dot matrix included. For example: "Payment within 30 days."
- Signature boxes, with the labels of the left, middle, and right boxes. Leave a label empty to use the default label.
- Signer name and Signer title.
- Bank accounts for transfers. The accounts printed are the bank accounts ticked Show on Invoices on their cash account form (Master Data → Cash Accounts).
Marks on the print
- Mark COPY when printed again: the second and every later print is marked COPY. The print history still records every print when this mark is off. The manager of the document's area can print one reprint without this mark, see Reprinting without the COPY mark.
- Status label: for example Paid or Unpaid, beside the date and the total.
- Amount in words: the amount written out in words, for example "two million rupiah".
- Foot line under each page: Date and time printed, Name of who printed it, and Page number.
Reprinting without the COPY mark
Sometimes a customer asks for a note without COPY on it, for example because the original was lost. The mark does not have to be switched off for the whole shop:
- Open the document, press Print, then choose the print (for example Print PDF or Delivery Note).
- Tick Without the COPY mark, then print. For the till receipt, press Print without the COPY mark in the receipt window. For Send via WhatsApp, tick the same option before opening WhatsApp.
The option only shows for a reprint that would be marked COPY, and only to the manager of that document's area: Cashier Manager for notes, invoices, sales delivery notes, quotations, sales orders and work orders; Purchasing Manager for purchase notes and orders, and the delivery notes of purchase returns; Warehouse Manager for stock transfers and adjustments, and the delivery notes of stock transfers; Finance Manager for receipts. The shop owner can on every document. Give another person that manager role when needed (Settings → Users).
That print is still recorded in the document's history, with the name of who printed it and (without the COPY mark). The next print is marked COPY again.
The paper size of each document is set on the same page. See Choosing the print paper for each document.