
Adding products and customers
Add the goods you sell and your regular customers, one by one or all at once from an Excel file.
On this page
Before you start selling, enter the goods you sell. Your regular customers are worth entering too, especially those who like to pay later.
Adding products one by one
-
Open Master Data → Products.
-
Press New Product.
-
Fill in Name, for example Gula Pasir 1 kg. Write the name the way your cashier usually searches for it.
-
Fill in Code if there is one. You may scan the barcode on the packaging, type your own code, or press the Generate code button on the right of the field. Left empty or typed as AUTO, the code is made when the product is saved.
-
Check Base Unit. By default it is pcs. Stock is always counted in this unit.
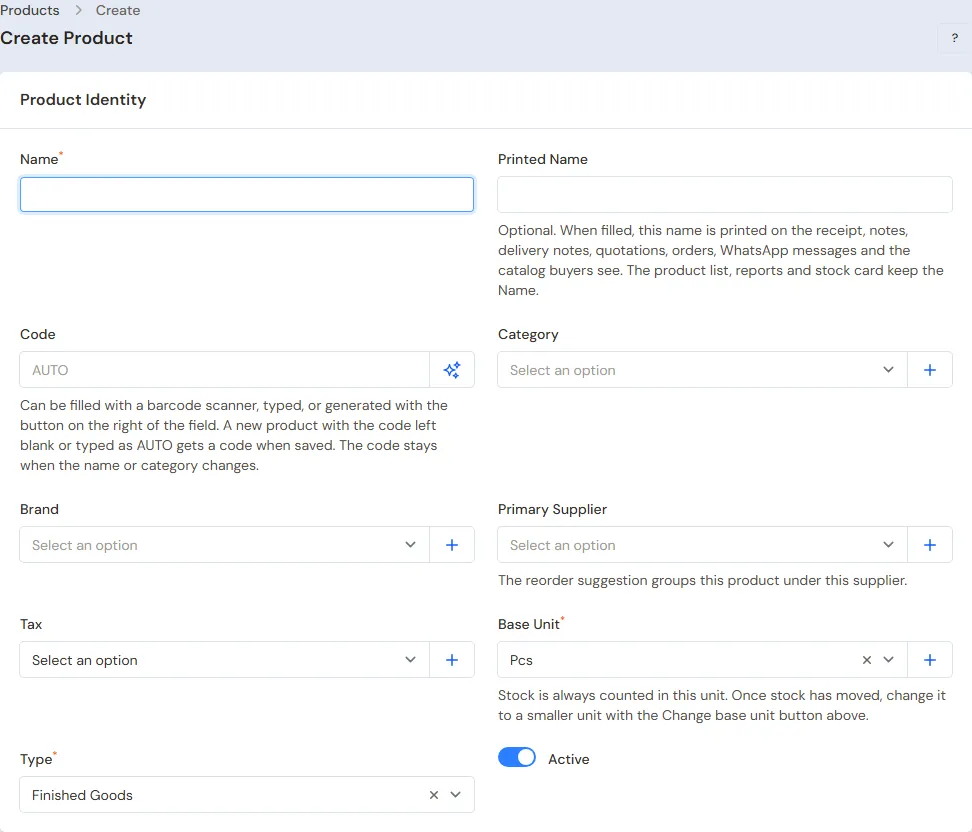
The first section of the product form. Cost Price and Selling Price are in the section below it -
Fill in Cost Price and Selling Price per base unit. Example: cost Rp 12.000, selling price Rp 15.000.
-
Press Create.
You may leave the category and brand empty for now. Other fields, such as other units (for example a box of 24) and the minimum stock, can be completed at any time. Every field is explained in Adding a product.
Tip: The cost price does not have to be perfect. The next purchase updates the cost price by itself.
Adding goods straight from the sales screen
Forgot to enter a product? The cashier does not need to leave the sales screen.
- On the till and Quick Sale, press + New product beside the search box (+ New on a phone). On other screens, tap the search box or type the product name.
- Choose Add a new product under the search box. It also shows when a search does not find the product.
- Fill in the name, unit and price, then press Save and add.
The product is saved in the product list and goes straight onto the note. This choice only appears for users who may add products.
Adding customers
- Open Master Data → Customers.
- Press New Customer.
- Fill in Name, for example Bu Siti, or the name of their shop.
- Fill in Phone. This number is used to send receipts by WhatsApp.
- Press Create.
You can fill in the customer's Group, Payment Terms (days) and delivery addresses later. See Adding and changing customers.
You do not need to enter buyers you do not know. On the sales screen, just leave the customer empty for a walk-in customer. A walk-in customer must pay in full. A sale that is not fully paid always needs a customer.
Entering a lot of data at once from Excel
Do you have your list of goods or customers in Excel? Import it instead of typing it one by one.
- Open Master Data → Products or Master Data → Customers.
- Press Import Products or Import Customers.
- Download the Excel example in the window that opens, then copy your data into that file.
- Upload the file, then press Import.
One file may hold up to 5.000 rows. The import runs in the background. The result appears on the bell, and the rows that failed can be downloaded with their reasons. The full steps are in Importing data from Excel. The columns of the product file are explained in Importing and exporting products with Excel.
Important: A product import does not fill in stock. The goods already in your shop are recorded as opening stock. See Entering opening balances.
Next step
Once your products and customers are in, record the cash, stock, receivables and payables you already have when you start using Vende. Continue to Entering opening balances.