
Adding and changing customers
Register customers with their WhatsApp number, price group, payment terms, and delivery address, from Customers, the till, or an Excel file.
On this page
A customer is a person or a shop that buys from you and whose name you want to record. A buyer who is not recorded is called a walk-in customer.
You need to register a customer when you want to record receivables, give special prices, collect points, or send receipts through WhatsApp.
Adding a customer
- Open Master Data → Customers, then press New Customer.
- Fill in the Name, for example Bu Siti or Toko Maju Jaya.
- Fill in the Phone. This number is used to send receipts through WhatsApp. When the same number is already used by another customer, Vende warns you so the data is not duplicated.
- Choose the Group if there is one, for example Wholesale. The group decides the prices and the discount of this customer.
- Fill in Payment Terms (days) when the customer may pay later. The due date of an unpaid note is then filled in automatically that many days after the note date.
- Fill in other fields if needed.
- Press Create. Press Create & create another to go straight on to the next customer.
Other fields you may fill in:
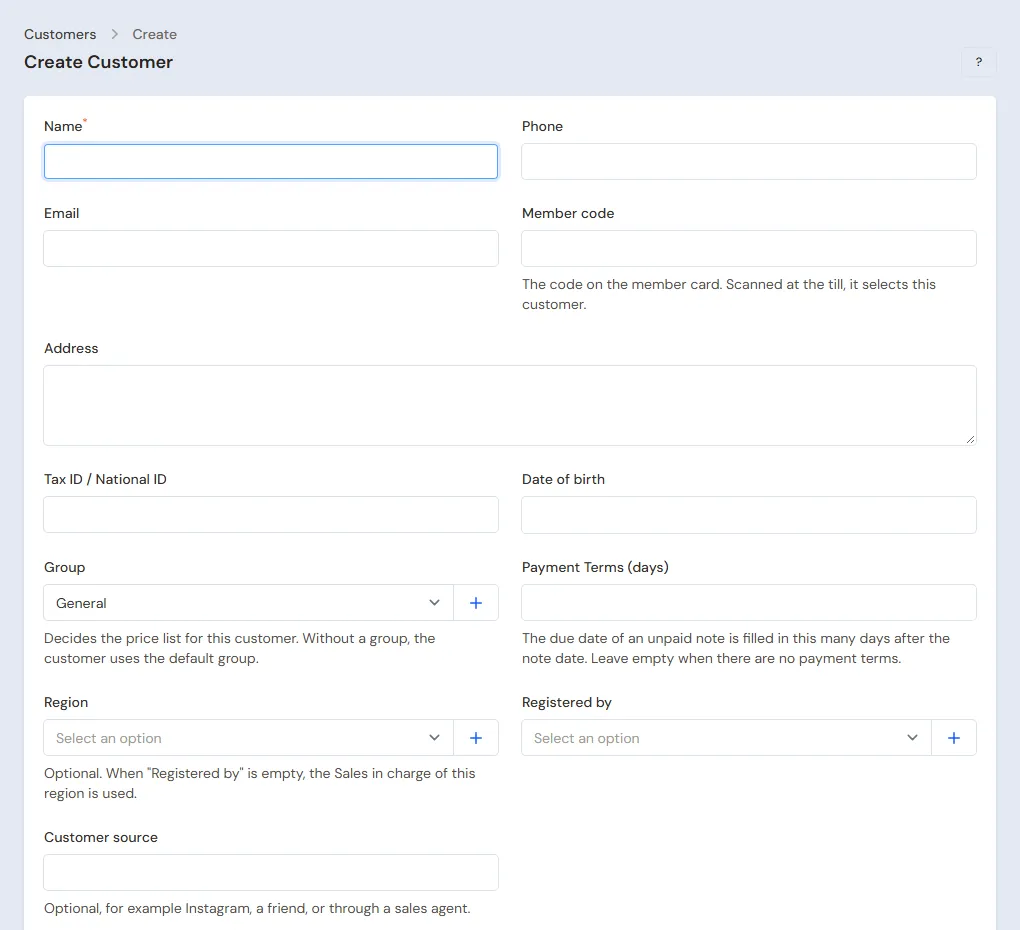
- Email, Address, and Note.
- Member code: the number of the member card. When it is scanned at the till, this customer is chosen straight away.
- Tax ID / National ID and Date of birth.
- Business Licence Number (Pharmacy / PBF) and Licence Valid Until, when the Registration & certificates feature is on. See Registration numbers, halal certificates and customer licences.
- Region: this customer's region, for example a district. Shown while the Sales feature is on. See Regions and the Sales in charge.
- Registered by: the sales agent who brought in this customer.
- Customer source: for example Instagram, a friend, or through a sales agent.
- Credit Limit: see Setting and monitoring customer receivables.
Adding from the till screen
A new customer arrives while you are selling? There is no need to leave the till screen.
- Open the Customer field's list and choose + Create new under it. A name already typed is filled in. The New customer button (the plus icon) next to the field does the same.
- Fill in the Name, the WhatsApp number, the Address (optional), and the Customer group if needed. The seldom-used details (Region when the Sales feature is on, email, NPWP/NIK, payment term, note, and the receivable limits when that feature is on) are in the folded More details section. On screens other than the till, the window asks for Name, Phone and Address, with the same More details section.
- Press Save and choose. The customer is saved and chosen on the note straight away.
The other details can be completed later in Master Data → Customers.
Regions and the Sales in charge
The Sales feature, when on, adds Master Data → Regions: the list of your shop's regions, for example one district each. Handy for distributors who divide their sales agents by region.
- Open Master Data → Regions, then press Create Region.
- Fill in the Name, for example Sukasari, and choose the Sales in charge if there is one. The Sales field may stay empty.
- In the customer's details, choose their Region. It can also be done under More details when adding a customer from a sales screen, or through the region column of the Excel import (a region that does not exist yet is created).
A customer who is given a region and has no Registered by yet starts with the Sales in charge of that region. A Sales that is already filled in is never replaced, and on the customer that Sales can still be changed or emptied. A Sales route stays a list of visits, not a region: one customer can be on several routes.
Regions filter the customer list, group Profit by Item by the customer's region, and split the Receivables report per region. A region that customers still use cannot be deleted for good, only archived.
Delivery addresses
A customer who gets goods delivered can have several addresses, for example Home and Warehouse.
- Open the customer in Master Data → Customers.
- Below the form, open the Delivery Addresses tab, then press New Delivery Address.
- Fill in Address name, Recipient name, Phone, and Address.
- Turn on Main address for the address used most often.
The main address is offered first on orders and notes. A customer without a delivery address uses their Address, and the starting address on orders, Invoice Mode and the till is worked out the same way.
The customer list
The list in Master Data → Customers shows the receivable of each customer, and also their points when points are on. The Member code and Credit Balance columns start hidden so the list fits the screen; show them from the columns button. The money icon on the row of a customer who still owes, and the Receive payment button on the customer page, open Sale Payments with all their unpaid notes filled in. See Giving and redeeming customer points.
- Search by name, phone, member code, or words from the Note field.
- Filter by group, region (while the Sales feature is on), or choose Birthday today. Customers whose birthday is today and who have a phone number get a cake icon (WhatsApp greeting) on their row, to send their wishes through WhatsApp.
- Press a row to see the details of that customer. The Edit button on that page (or the pencil icon on the row) opens the edit form, only for those who may change customers.
Importing from Excel
Have a list of customers in Excel?
- In Master Data → Customers, press Import Customers.
- Download its example file (CSV or Excel), then fill it in.
- Upload the file.
The region column (while the Sales feature is on) holds the region's name: an existing one is used, a missing one is created. A new customer without a Sales starts with the Sales in charge of their region.
While the Registration & certificates feature is on, the example file also has the columns licence_number and licence_valid_until (a day such as 2028-01-01). See Registration numbers, halal certificates and customer licences.
The rows that fail are reported with their reasons, and can be downloaded from Settings → Import History. The import button is only there for users who are allowed to import.
Deactivating and deleting
- A customer who is no longer used can be switched off through the Active field. Their history stays.
- The Delete button on the customer page deletes them. A customer who still has receivables, a credit balance, credit notes, or order down payments cannot be deleted yet.
- A deleted customer can still be restored through the Deleted records filter of the list.